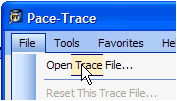
Open the trace file
- Open your SQL trace file by choosing Open from the File menu.
- Use the standard Windows dialog to find your trace file. For implementations with trace files stored on a Unix server, find out if these locations can be “mounted” to access the file more easily. If this is a trace file from a batch (COBOL or AE) process, you may just want to right-click on the file from the browser and choose “Save Target As…” or “Save Link As…” (depending on your browser) and place the file on your desktop. After selecting the trace file you wish to view, you will be presented with a dialog box similar to the following:
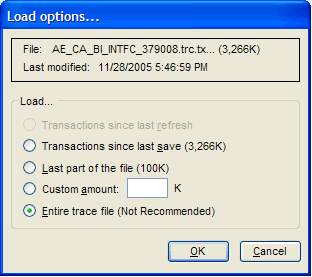
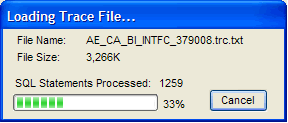
- Choose how much of the file you wish to open. This dialog gives you the option to only load a portion of the file. For online tracing or a trace file associated with a failed batch routine, you may only be interested in the last statements in the file, for example. In those cases, specify a smaller amount of the file to load using the “Last part of the file” or specify a “Custom amount” in the dialog above. Click OK to load the file. For larger files, a dialog similar to the following will count the statements processed from the file during the load.
- Once the file has loaded, you can click and unclick the “SQL View Options” checkboxes on the screen to show only statements matching the selections. Note that there are two rows of checkboxes: one for “System” and one for “Application” tables. Application tables begin with “PS_” while System tables start with “PS.” Generally, PeopleSoft stores data that would be presented to a user onscreen (a voucher, employee, payment, benefit plan, etc.) in application tables. This is just a general rule, however, and there are exceptions.
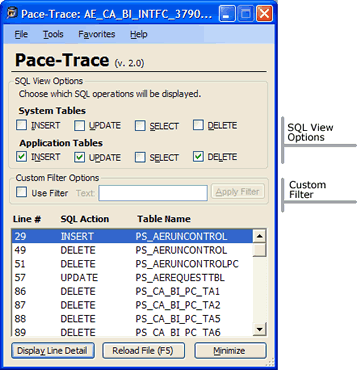
- After choosing your SQL View options, you may want to further restrict your view by “filtering” for particular data. For example, you may only be interested in statements related to employee-id “0000341525.” To do this, click the “Use Filter” checkbox, enter the text in the box to the right, and click “Apply Filter.”
- Double-click on any line to view the full SQL associated with that particular line. You will be presented with a dialog similar to the following:
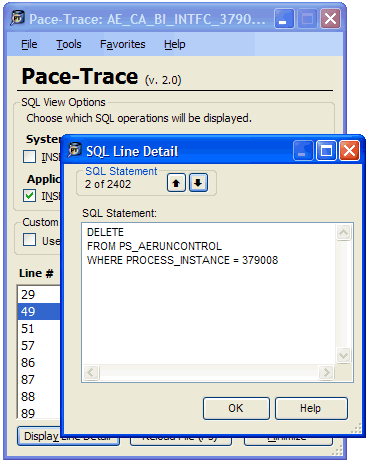
- View the actual SQL text associated with your selected line. Click the “OK” button to return to the main view, or use the navigation buttons near the top to move from one statement to the next without ever returning to the main list.
- After choosing your SQL View options, you may want to further restrict your view by “filtering” for particular data. For example, you may only be interested in statements related to employee-id “0000341525.” To do this, click the “Use Filter” checkbox, enter the text in the box to the right, and click “Apply Filter.”
Choose what statements display
Working through the details
A special note about “INSERT” statements
If you double-click on a line with an INSERT statement, Pace-Trace may open the dialog with an Excel-like grid similar to the following:
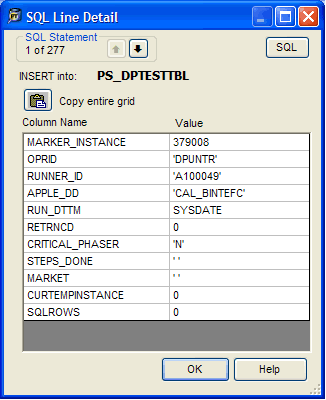
This summarizes the insert statement with the name of the table being inserted into at the top (PS_DPTESTTBL), as well as a list of the values to be inserted into the table listed in the right column, and the column that will be receiving the value in the left column. This display is ideal to copy to Excel or Word for documentation — click the copy icon above the grid to copy the entire grid into the clipboard. To see the insert as SQL, click the “SQL” button in the upper right to change the display to this:
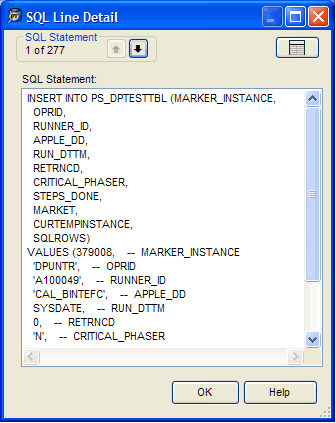
The SQL button now has a picture of a grid on it. You may switch back and forth between the two views at will by clicking that same button.
Learning more…
The complete documentation for the product is currently being (re)written; until then, read the feature summary page as a guide to the available functionality. If the product is as easy to use as I hope, any feature you find of interest in that list will be easy to locate and use in the product.